
Google OAuth & Multi-Account Google Calendar Setup
This guide explains how to configure Google Cloud, Google Auth Platform, and OpenScribe for primary user sign-in and multi-account read-only Google Calendar synchronization.
Throughout this guide, replace https://scribe.example.com with your own configured PUBLIC_URL (for example https://scribe.akyonlabs.com in production or http://127.0.0.1:8090 for local development).
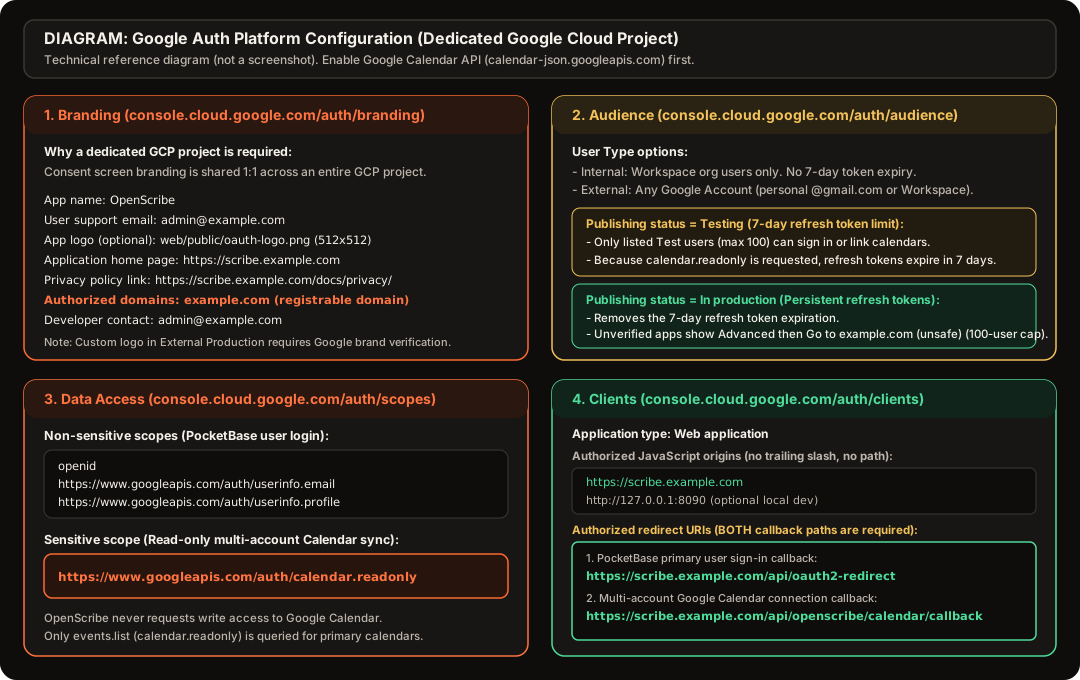
1. Create a Dedicated Google Cloud Project
Create a dedicated Google Cloud project for your OpenScribe deployment rather than reusing a project that hosts other apps. Google Cloud enforces a strict 1:1 relationship between a project and its OAuth consent screen (Branding, Audience, and Data Access). Sharing a project across unrelated applications mixes application names, logos, authorized domains, and scope verification requirements.
Create the Project in Google Cloud Console
- Open console.cloud.google.com/projectcreate.
- Enter a Project name (for example,
OpenScribe) and select your Billing account or Organization if applicable. - Click Create and wait for Google Cloud to provision the project, then select it in the top project switcher.
Create the Project with gcloud CLI (Optional)
export GCP_PROJECT_ID="openscribe-prod-$(date +%s)"
gcloud projects create "$GCP_PROJECT_ID" --name="OpenScribe"
gcloud config set project "$GCP_PROJECT_ID"
2. Enable the Google Calendar API
OpenScribe uses the Google Calendar v3 REST API (events.list) to fetch upcoming and past meetings across your connected Google accounts.
Enable the API in Google Cloud Console
- Open APIs & Services -> Library at console.cloud.google.com/apis/library.
- Search for Google Calendar API (
calendar-json.googleapis.com). - Click Google Calendar API and click Enable.
Enable the API with gcloud CLI (Optional)
gcloud services enable calendar-json.googleapis.com --project="$GCP_PROJECT_ID"Note: Google OAuth2 / OpenID Connect userinfo endpoints (
oauth2.googleapis.comandopenidconnect.googleapis.com) are enabled by default in every Google Cloud project.
3. Configure Google Auth Platform (OAuth Consent Screen)
Google replaced the legacy APIs & Services -> OAuth consent screen view with the unified Google Auth Platform console. Configure the four sections below in order.
3.1 Branding (console.cloud.google.com/auth/branding)
- Open console.cloud.google.com/auth/branding (or click Get started under Google Auth Platform -> Overview).
- Fill in App Information:
- App name:
OpenScribe - User support email: Select your primary administrator email address.
- App logo (optional): Upload
web/public/oauth-logo.png(512x512PNG). Note that uploading a custom logo on an External app published In production triggers Google brand verification. Skip the logo if you want immediate unverified production use without waiting for brand review.
- App name:
- Fill in App domain:
- Application home page:
https://scribe.example.com - Application privacy policy link:
https://scribe.example.com/docs/privacy/(do not point to a generic/docsindex page, because Google OAuth review requires a dedicated public privacy policy disclosing Google user data handling). If your OAuth client lives inside a shared parent-domain Google Cloud project (such asakyonlabs), keep the shared umbrella privacy URL on Branding and ensure it covers or links to<PUBLIC_URL>/docs/privacy/. - Application terms of service link:
https://scribe.example.com/docs/privacy/(optional)
- Application home page:
- Under Authorized domains, click Add domain and enter your registrable root domain without scheme or subdomain:
- Example: If
PUBLIC_URLishttps://scribe.example.com, addexample.com. - Example: If
PUBLIC_URLishttps://scribe.akyonlabs.com, addakyonlabs.com. - Do not add
localhostor127.0.0.1under Authorized domains (Google automatically permits loopback origins for local testing).
- Example: If
- Enter your Developer contact information email address and click Save.
3.2 Audience (console.cloud.google.com/auth/audience)
Open console.cloud.google.com/auth/audience and choose your User type and Publishing status:
| Setting | Behavior & Token Lifetime | When to Choose |
|---|---|---|
| User type: Internal | Only accounts inside your Google Workspace organization can sign in or connect calendars. Refresh tokens do not expire after 7 days, and no sensitive-scope verification is required. | Best when every user and every linked calendar belongs to the same Google Workspace organization. Note that an Internal app cannot link a personal @gmail.com calendar. |
| User type: External | Any Google Account (both Google Workspace and personal @gmail.com accounts) can sign in and connect calendars. Required whenever you connect a personal Gmail calendar alongside a work calendar. | Required for personal @gmail.com accounts or multi-organization calendar connections. |
| Publishing status: Testing | Only email addresses explicitly listed under Test users (up to 100 addresses) can authenticate. Important: When an External app is in Testing mode and requests calendar.readonly, Google automatically expires issued OAuth refresh tokens after 7 days. | Good for initial setup or short-lived testing. If you stay in Testing, add every Google account you plan to link under Test users. |
| Publishing status: In production | Issued refresh tokens are persistent (they do not expire after 7 days unless revoked by the user). If you have not completed Google Sensitive Scope Verification for calendar.readonly, users see no warning during basic sign-in (openid, email, profile), but see Google hasn't verified this app when connecting Google Calendar (calendar.readonly). Users can click Advanced -> Go to example.com (unsafe) to grant consent (subject to Google's 100-user unverified cap) until sensitive-scope verification is approved. | Recommended for self-hosters using External user type so linked calendar refresh tokens do not expire every 7 days. |
3.3 Data Access / Scopes (console.cloud.google.com/auth/scopes) and Verification Center
- Open console.cloud.google.com/auth/scopes and click Add or remove scopes.
- Select the three non-sensitive identity scopes used for PocketBase user sign-in and calendar account identification:
openidhttps://www.googleapis.com/auth/userinfo.emailhttps://www.googleapis.com/auth/userinfo.profile
- Search for
calendar.readonly(or paste into Manually add scopes) and add the single sensitive read-only Calendar scope:https://www.googleapis.com/auth/calendar.readonly
- Click Update, then click Save.
- To remove the Google hasn't verified this app interstitial during Connect Google Calendar for all users, open console.cloud.google.com/auth/verification (Verification Center) and complete Sensitive Scope Verification for
https://www.googleapis.com/auth/calendar.readonly. Note that a green Your branding has been verified badge on Branding only verifies app identity (name, logo, and homepage/privacy links) for non-sensitive login scopes. Removing the warning on Calendar connection additionally requires declaringcalendar.readonlyin Data Access, providing a written read-only scope justification, and submitting a YouTube demonstration video showing the end-to-end OAuth consent screen and read-only event sync in OpenScribe.
OpenScribe never requests write permissions to your Google Calendar. It only reads calendar event metadata (summary, description, start, end, attendees, hangoutLink, conferenceData, recurringEventId) using calendar.readonly.
4. Create the Web Application OAuth Client (Clients)
OpenScribe uses a single Web application OAuth 2.0 Client ID for both PocketBase user sign-in and multi-account Google Calendar connections. Because each flow terminates at its own server handler, you must register both callback paths on that client.
- Open console.cloud.google.com/auth/clients and click Create client.
- Select Application type: Web application.
- Set Name to
OpenScribe Web. - Under Authorized JavaScript origins, click Add URI and add your exact origin (scheme, host, and port only, with no trailing slash and no path):
- Production origin:
https://scribe.example.com - Local development origin (optional):
http://127.0.0.1:8090andhttp://localhost:8090
- Production origin:
- Under Authorized redirect URIs, click Add URI and register both callback endpoints:
| Purpose | Production Redirect URI (PUBLIC_URL) | Local Development Redirect URI | Handled By |
|---|---|---|---|
| 1. Primary User Sign-In | https://scribe.example.com/api/oauth2-redirect | http://127.0.0.1:8090/api/oauth2-redirect | PocketBase built-in OAuth2 (users collection in server/auth.go) |
| 2. Multi-Account Calendar Link | https://scribe.example.com/api/openscribe/calendar/callback | http://127.0.0.1:8090/api/openscribe/calendar/callback | Custom Calendar OAuth handler (registerCalendarRoutes in server/calendar.go) |
- Click Create.
- Copy the Client ID (
GOOGLE_CLIENT_ID, ending in.apps.googleusercontent.com) and Client secret (GOOGLE_CLIENT_SECRET, starting withGOCSPX-) into your.envfile or OpenShip project secrets.
5. Required Environment Variables
Configure the following variables in .env (with chmod 600 .env) or in your deployment secret manager:
PUBLIC_URL=https://scribe.example.com
GOOGLE_CLIENT_ID=123456789012-abcdefghijklmnopqrstuvwxyz.apps.googleusercontent.com
GOOGLE_CLIENT_SECRET=GOCSPX-your-google-client-secret
OPENSCRIBE_ADMIN_EMAIL=you@example.com
PB_ENCRYPTION_KEY=0123456789abcdef0123456789abcdef
OPENSCRIBE_TOKEN_ENCRYPTION_KEY=0123456789abcdef0123456789abcdef0123456789abcdef0123456789abcdef
How OPENSCRIBE_TOKEN_ENCRYPTION_KEY Works (server/crypto.go)
- OpenScribe never stores plaintext Google OAuth access or refresh tokens in SQLite (
data.db). Every token bundle incalendar_accounts.encrypted_tokenis encrypted with AES-256-GCM using a random 12-byte nonce prepended to the ciphertext and encoded withbase64.RawURLEncoding(encryptTokenPayloadanddecryptTokenPayloadinserver/crypto.go). - In production, generate a dedicated 32-byte key (64 hex characters or 43-44 base64 characters) via:
openssl rand -hex 32 - If
OPENSCRIBE_TOKEN_ENCRYPTION_KEYis omitted in local development,encryptionKey()(server/crypto.go) derives a deterministic 32-byte key using SHA-256 overGOOGLE_CLIENT_SECRET|openscribe-calendar-token-key|OPENSCRIBE_ADMIN_EMAIL. Setting an explicitOPENSCRIBE_TOKEN_ENCRYPTION_KEYis strongly recommended so rotatingGOOGLE_CLIENT_SECRETdoes not invalidate storedencrypted_tokenciphertexts.
How PocketBase Syncs the Google Provider (server/auth.go)
On every server bootstrap (applyRuntimeSettings in server/auth.go), OpenScribe reads GOOGLE_CLIENT_ID and GOOGLE_CLIENT_SECRET from the environment and automatically configures the google OAuth2 provider on the PocketBase users collection with PKCE = true. You do not need to paste the Client ID or Client Secret manually inside the PocketBase Admin UI (/_/).
Furthermore, registerAuth (server/auth.go) checks every authenticating user against OPENSCRIBE_ADMIN_EMAIL (syncUserAdminFlag). Only a verified account whose email matches OPENSCRIBE_ADMIN_EMAIL receives admin = true.
6. How Multi-Account Google Calendar OAuth Works (server/calendar.go)
A single OpenScribe user can connect multiple Google Calendar accounts (for example, alice@company.com, alice@client.org, and alice@gmail.com). Each connected calendar is stored as a separate record in calendar_accounts with a unique index on (owner, email, calendar_id).
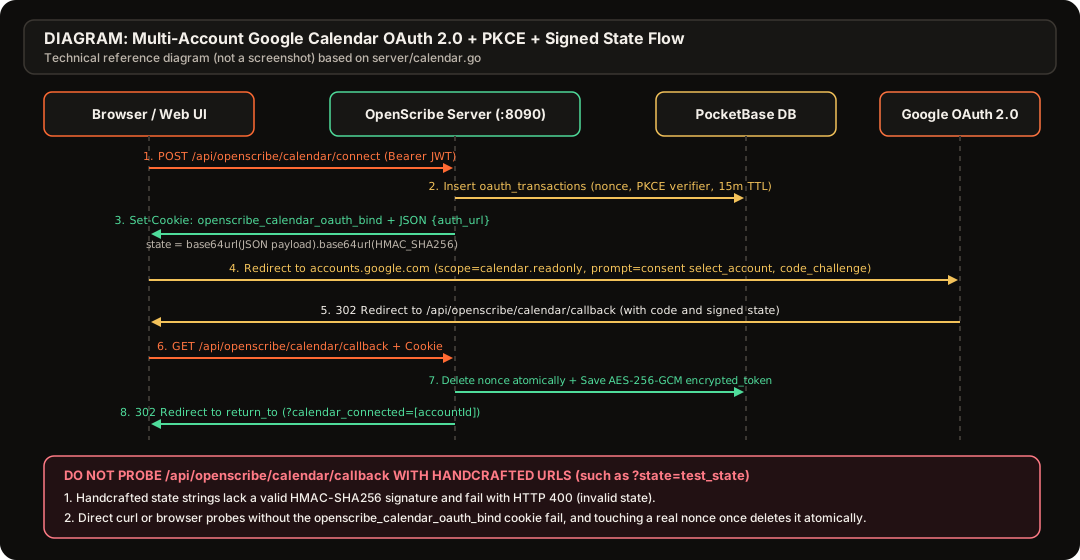
End-to-End Request Lifecycle
- Initiate Connection (
POST /api/openscribe/calendar/connect):- The authenticated user clicks Connect Google Calendar in the web UI (
web/src/App.tsx), sendingPOST /api/openscribe/calendar/connectwithAuthorization: Bearer <pb_jwt>and optional JSON{"calendar_id": "primary", "return_to": "/"}. - If
GOOGLE_CLIENT_IDorGOOGLE_CLIENT_SECRETis not set, the server returnsHTTP 400(Google OAuth is not configured on the server.). - Otherwise,
/api/openscribe/calendar/connect(server/calendar.go) generates:- A 16-byte random hex
nonce - A 32-byte PKCE
code_verifierand S256code_challenge - A 24-byte
browserBindingtoken stored in anHttpOnly,SameSite=Laxcookie namedopenscribe_calendar_oauth_bind(withSecure=truewhenPUBLIC_URLuseshttps://or the request arrives over TLS) scoped to/api/openscribe/calendar/callbackwith a 15-minuteMaxAge - A database record in
oauth_transactionsstoringowner,nonce,browser_binding_hash(SHA-256 of the cookie value),code_verifier,calendar_id,return_to, andexpires(15 minutes from creation) - A signed
statestring formatted as<base64url(JSON payload)>.<base64url(HMAC-SHA256 signature)>, where the JSON payload contains{"uid","nonce","cal","ret","exp"}
- A 16-byte random hex
- The endpoint returns
200 OKwith{"auth_url": "https://accounts.google.com/o/oauth2/v2/auth?...", "redirect_uri": "<PUBLIC_URL>/api/openscribe/calendar/callback", "scopes": [...]}includingaccess_type=offline,prompt=consent select_account,include_granted_scopes=true, andcode_challenge_method=S256.
- The authenticated user clicks Connect Google Calendar in the web UI (
- User Consent at Google:
- The browser navigates to
auth_url. Becauseprompt=consent select_accountis passed, Google always displays the account chooser (allowing the user to pick a second or third Google account) and issues a freshrefresh_token.
- The browser navigates to
- Callback Verification (
GET /api/openscribe/calendar/callback):- Google redirects the browser to
<PUBLIC_URL>/api/openscribe/calendar/callback?code=...&state=.... /api/openscribe/calendar/callback(server/calendar.go) verifies the HMAC-SHA256 signature onstate, checks thatexphas not passed, looks up theoauth_transactionsrecord bynonce, verifies that theopenscribe_calendar_oauth_bindcookie SHA-256 matchesbrowser_binding_hash, and atomically deletes theoauth_transactionsrecord before calling Google so the nonce can never be replayed.- The server exchanges
code+code_verifierathttps://oauth2.googleapis.com/token, fetches the connected account's identity (sub,email,name) fromhttps://openidconnect.googleapis.com/v1/userinfo, encrypts the token payload with AES-256-GCM, and upserts thecalendar_accountsrecord withsync_status = "connected". - Finally, the server clears the
openscribe_calendar_oauth_bindcookie and returns a302 Foundredirect to<PUBLIC_URL><return_to>?calendar_connected=<accountId>(or returns200 OKJSON{"account": ...}when the request headerAccept: application/jsonis sent).
- Google redirects the browser to
Warning: Never Probe /api/openscribe/calendar/callback with Handcrafted URLs
Do not test /api/openscribe/calendar/callback by opening it directly in a browser or running curl with a synthetic query string such as ?code=test&state=test_state:
- Handcrafted
statestrings lack a valid<base64url(payload)>.<base64url(HMAC)>signature and immediately returnHTTP 400(Invalid OAuth state signature.orMalformed OAuth state.). - Calling
/api/openscribe/calendar/callbackwith a realstatecopied from another session without the matchingopenscribe_calendar_oauth_bindcookie fails withHTTP 400(Missing browser binding cookie for OAuth callback.orOAuth callback does not match the initiating browser session.). - Once a real
nonceis verified and consumed,oauth_transactionsdeletes it atomically. Re-loading the same callback URL a second time returnsHTTP 400(OAuth state was already used or not found.).
7. Troubleshooting Common Google OAuth & Calendar Errors
| Symptom or HTTP Error | Root Cause | Fix |
|---|---|---|
Google Error 400: redirect_uri_mismatch | Either PUBLIC_URL does not match the browser URL, or one of the two redirect URIs is missing in Google Auth Platform -> Clients. | Check GET /api/openscribe/config and confirm public_url matches your domain without a trailing slash. Ensure both <PUBLIC_URL>/api/oauth2-redirect and <PUBLIC_URL>/api/openscribe/calendar/callback are listed under Authorized redirect URIs. |
Google Error 403: access_denied (App is currently being tested) | The Google Auth Platform Audience publishing status is set to Testing, and the Google account you selected is not listed under Test users. | Either add that email address under Google Auth Platform -> Audience -> Test users, or click Publish app to move the consent screen to In production. |
Calendar sync_status flips to "revoked" after 7 days | Google expires refresh tokens after 7 days for External apps in Testing mode that request calendar.readonly. | Switch Google Auth Platform -> Audience -> Publishing status to In production, then click Connect Google Calendar again in OpenScribe to mint a persistent refresh token. |
Calendar sync_status is "error" during GET /api/openscribe/calendar/events?sync=true | The Google Calendar API (calendar-json.googleapis.com) is disabled in your Google Cloud project, or OPENSCRIBE_TOKEN_ENCRYPTION_KEY was changed after linking the account. | Enable Google Calendar API at console.cloud.google.com/apis/library and re-link the calendar account in OpenScribe. |
POST /api/openscribe/calendar/connect returns HTTP 400 (Google OAuth is not configured on the server.) | GOOGLE_CLIENT_ID or GOOGLE_CLIENT_SECRET is empty in the server environment. | Set both variables in .env (or OpenShip secrets) and restart the server. Verify google_oauth_enabled: true in GET /api/openscribe/config. |
GET /api/openscribe/calendar/callback returns HTTP 400 (Missing browser binding cookie for OAuth callback. or OAuth callback does not match the initiating browser session.) | The browser started /api/openscribe/calendar/connect on one host (for example http://localhost:8090) while PUBLIC_URL redirected the callback to a different host (for example http://127.0.0.1:8090), preventing the openscribe_calendar_oauth_bind cookie from being sent. | Access the OpenScribe web UI from the exact hostname configured in PUBLIC_URL. |
Google hasn't verified this app interstitial appears during Connect Google Calendar, even though basic Sign-In has no warning | Basic Sign-In (web/src/api.ts) requests only non-sensitive openid, email, and profile scopes, whereas Connect Google Calendar (server/calendar.go) requests https://www.googleapis.com/auth/calendar.readonly, which Google classifies as a Sensitive scope. Brand verification alone does not approve sensitive scopes. | Add openid, userinfo.email, userinfo.profile, and https://www.googleapis.com/auth/calendar.readonly under Google Auth Platform -> Data Access, ensure <PUBLIC_URL>/docs/privacy/ is live and linked in your privacy policy, and complete Sensitive Scope Verification (scope justification + YouTube demo video) in Verification Center. Until approved, authorized users can click Advanced -> Go to ... (unsafe) to complete consent. |